Building a Form
Forms can only be built on the Desktop App
Set the Form Details
- Go to Forms → Form Library
- Click + Add Form
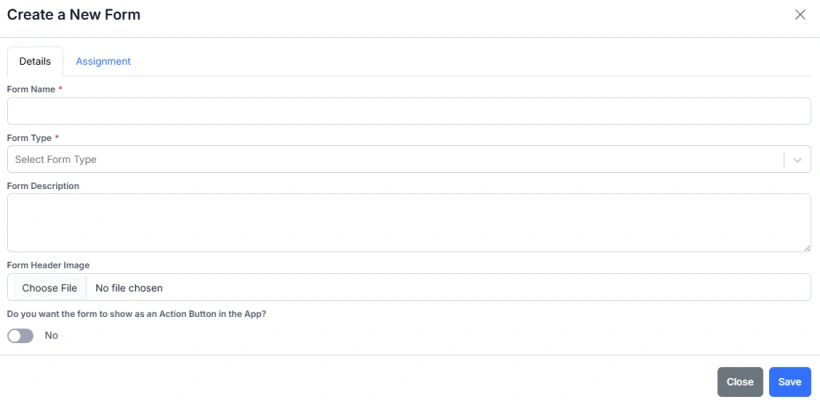
- Enter a Form Name, select a Form Type, and enter an optional Description and Image.
- If you want the form to be available to start on the Mobile App, toggle Do you want the form to show as an Action Button in the App? to Yes.

- Change the App Sort Order, provide an optional name (this overwrites the Form Name when displayed in the Mobile App) and select an icon to display in the Mobile App.
Set the Form Assignment
Form Assignments control who can access and complete a form, and where the form is available in Samurai. Assignments are used to limit form visibility to specific departments, teams, user roles, asset classes, or asset groups.
When creating or editing a form, use the Assignment tab to define access rules. You can select one or more options in each category, or toggle All to make the form available system-wide.
For example:
- If you assign the form to the Wattle Creek Department, only users who have access to that department will be able to view and complete the form.
- If you assign it to the Supervisor role, only users with that role will see the form in their list.
- If you select a specific Asset Class or Group, the form will only appear when working with assets that belong to that class or group.
Assignments make it easy to ensure that the right people see the right forms in the right context, keeping the form library organised and relevant for each team.

- Press the tab heading Assigment
- Select the desired Assignments
If you cannot see a form in the mobile app or when trying to assign it to a work order, first check the Form Details and make sure Do you want the form to show as an Action Button in the App? is toggled to Yes. Otherwise, check the Form Assignments to see if it is restricted by its assignment settings.
For example, if the form is limited to certain departments, roles, or asset classes, and the work order’s asset does not belong to one of those groups, the form will not appear for selection.
Build the Form
The Form Builder allows you to create and edit digital forms used in Samurai for inspections, checklists, safety audits, and other maintenance activities.
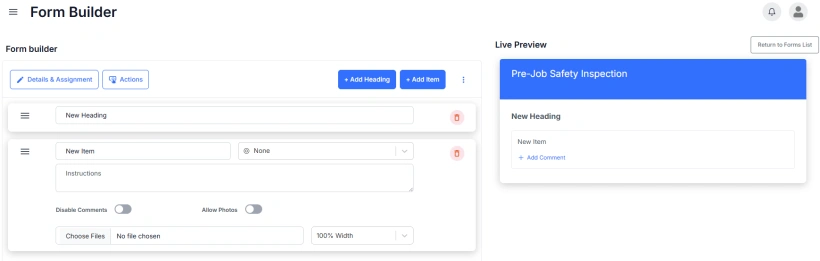
The builder is divided into two main areas:
- Form Builder Panel (left side): where you create and configure the form structure
- Live Preview (right side): a real-time view showing how the form will appear in the app
The preview updates automatically as you make changes.
Adding Headings and Items
Use the buttons at the top of the builder:
- + Add Heading – adds a new section heading to group related questions or checks.
- + Add Item – adds a new input item under a heading (for example, a question, checklist point, or data entry field).
Each new heading or item appears immediately in the preview.
Editing Headings
- To change the heading name, type directly into the Heading Title input.
- Changes are saved automatically and appear in the live preview immediately.
- Use the delete icon to remove the heading if no longer required.
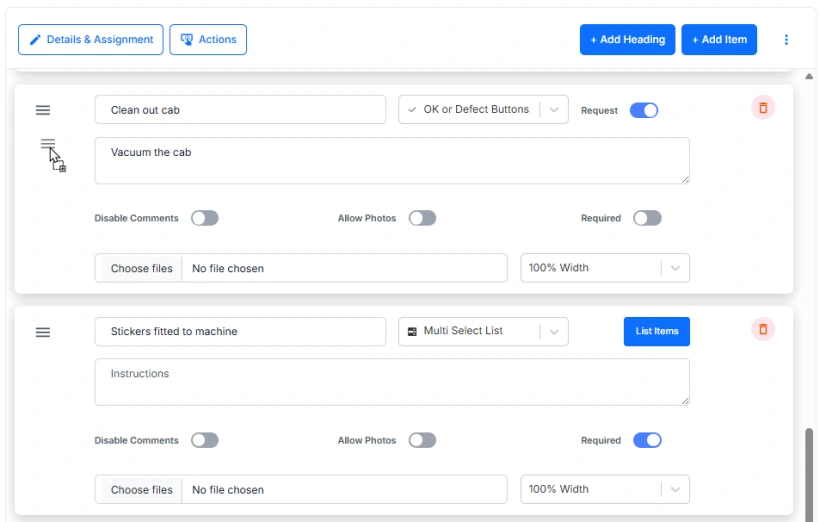
Editing Items
Each item includes several configurable fields and options:
- Item Title – enter a descriptive title (e.g. “Check oil level”).
- Input Type – select the type of input (Text, Date, List, Checkbox, etc.).
- Instructions – optional help text that appears below the item to guide users.
- Disable Comments – hides the comment field under the item when enabled.
- Allow Photos – adds a photo upload button beneath the item so users can attach images.
- Choose Files – attach one or more reference images that appear under the item (for example, diagrams or sample photos).
- Required - make the completion of the item mandatory
- Width – defines how wide the field appears on screen.
Each change is applied instantly and reflected in the preview.
Reordering Items
Drag-and-drop an item to reorder it
- Click on the 3 lines of the left of the item you want to move
- Drag it over the item where you would like to place it
- Let go
A prohibited symbol (⊘) will show beside the cursor if the item cannot be placed in that position.
Saving
All edits are saved automatically as you make changes. There is no need to manually save after each step. You can return to the Forms List at any time using the Return to Forms List button in the top right corner.
Next Steps
For details about the different Input Types (Text, Date, List, Checkbox, etc.) and their configuration options, see the Form Item Types section.